Growing tulips in water at home can make a beautiful gift for your loved ones and bring beauty to your home.

Tulips are one of the most beautiful flowers in any garden. Elegant and colorful, they will add a touch of spring to any environment. Growing tulips in water is a popular trend among gardeners and flower lovers. This method is simple and the results are stunning. In this blog post, we’ll walk you through a step-by-step guide to growing tulips in water.

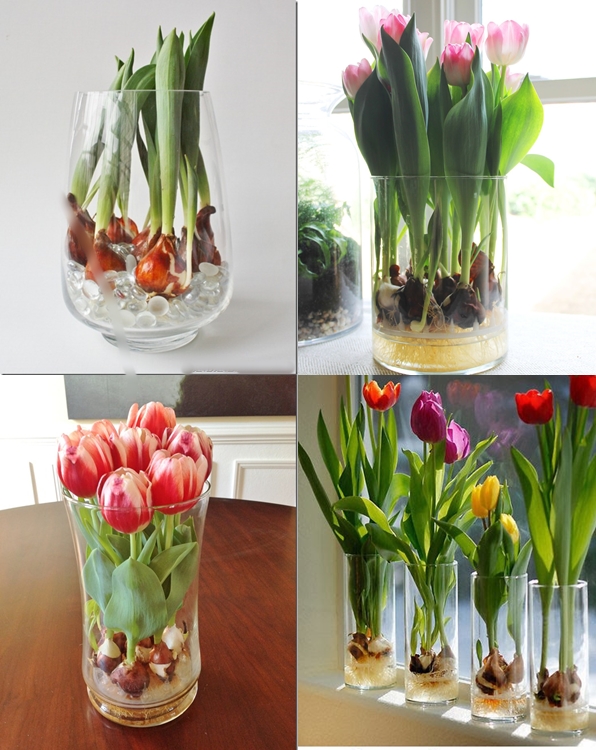
All you need to do is pour some water into the class container (about 1/3 full) and place your choice of glass marbles or rocks in the bottom of the container. This way you can actually see the roots sprout and also watch your 𝑏𝑎𝑏𝑦 grow.Insert the tulip bulb (tip side up) into the container and, if necessary, place any items you plan to use around the bulb in the bottom of the terrarium to hold it in place.

Step 1: Gather your materials
To grow tulips in water, you will need the following:
- tulip bulbs
- Glass vases, glass jars, vases or drift vases. Forcing a vase isn’t the most reliable solution for growing tulips, but it is an option.water
- Pebbles, decorative stones or glass beads
Step 2: Prepare the tulip bulbs

The first step is to prepare the tulip bulbs for planting. Remove the tulip bulbs and soak them in warm water for about two hours. This will help activate the bulb’s growth process.
Step 3: Select a vase or glass jar
Choose a glass container large enough to hold the tulip bulbs. The vase or jar should be clean and clear. In a clear container, you can watch your tulips grow over time.
Step 4: Put pebbles or decorative stones

Place a layer of pebbles or decorative stones at the bottom of a tall vase or glass jar. This provides support for the tulip bulbs and helps hold them in place.
Step 5: You Need To Add Water
Fill a vase or glass jar with fresh water until the water level is just below the surface of the pebbles. This should be enough water. For best results, the water should be at room temperature or slightly warmer.
Step 6: Put the tulip bulbs in the vase
Place the base of the bulb into a vase or glass jar. The bulb should be placed on the pebbles with the tip facing upwards. Make sure the bulbs are not touching the water level to begin the rooting process.
Step 7: Place the vase in a cool, dark place

Keep the vase or jar in a cool, dark place for about four to six weeks. This cooling period allows the roots of the tulip bulbs to develop and grow. It’s best to plant the bulbs in water vases at different times so you get the best blooms indoors at different times.
Step 8: Place the vase in a sunny location
After four to six weeks, you can place the vase or jar in a sunny location to allow for the flowering cycle. This will help encourage tulip plant growth and flowering. The water should be changed every few days to keep it fresh. Soon you will have spring flowers!
Step 9: Admire the Beautiful Tulips
After a few weeks, you will see the tops of the bulbs sprouting and growing. You can admire their beauty for a few days before they start to wilt. Once the tulips have wilted, you can throw them away and start the process over with fresh bulbs.
Growing tulips in water is an easy way to appreciate the beauty of these flowers and a great alternative to cutting tulips from the farmers market. In just a few simple steps, you can create a stunning vase of tulips at home. So why not give it a try this spring?
What To Do With Tulip Bulbs In Water After Blooming
What should I do if the tulip bulbs are soaked in water after they bloom? After flowering, the bulbs can be removed and saved for next season. We recommend this article to learn how to store tulip bulbs.
After the bulbs first stop blooming, remove the dead flowers from the stems and allow the remaining leaves to die back while keeping the water level in the glass vase at a safe level. When the leaves are completely dry, you may notice new small bulbs forming. Leave them alone.
Remove the leaves, but leave the roots intact, and keep the bulbs dry and cold until early November. Then place them in your garden based on your zone, using a healthy mix of soil and compost, and make sure you water them well when you first plant them